Monday

Cover Vents with Pantyhose


Have you ever noticed that there is stuff down in the vent?  It seems like there is always stuff falling through the crack of the vents.  How do you prevent dirt and stuff from falling through the cracks yet still allow the air to go through it?  Cover the vent with pantyhose!

I took pictures as I did the project but really I didn't need to.  Simply unscrew the vent an take it off, clean out the vent (I used homemade Clorox wipes - found here), cover the vent with pantyhose knee highs then screw the vent back into place.  So EASY!!!


Friday

Nail Polish Display


My future mother-in-law has a nail salon and she has made comments about needing more display cases for her nail polish.  Rather than just give her a small one to add to the collection of different racks for storing her nail polish we decided to just make one big display for all of them.  This was gifted to her for her birthday.

First we bought three picture ledges from IKEA for $15 each.  We mounted them to the wall.  Then we cut 1 inch by 1 inch pieces of wood to the length of the picture ledge.  I painted them white to match the ledges.  I put the painted pieces of wood towards the back of the picture ledge, which created two rows to put nail polish on each picture ledge.  The total amount for this project was less than $60.


Tuesday

Cat Themed Birthday Party

 
My daughter wanted a cat themed birthday party so here it is.  It was a lot of work but it was fun.  Below are photos with short explanations.
 

The kids tried to guess how many M&Ms were in the jar and the one who got closest won a small prize.


Each kid got a cat ears headband.  (Click here for the tutorial)


I bought cheap boas at Walmart and cut them into three pieces and used a safety pin to attach them to each kids pants as cat tails.


Each kids received a bottle of bubbles.


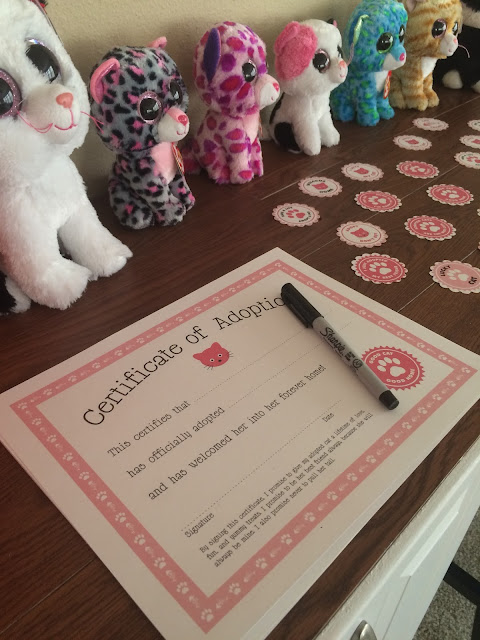
Each kid also "adopted" a cat.  I bought the cat stuffed animals and printed out "adoption certificates".  I also bought buckets from Dollar Tree so they could put them in.


I bought initial charms and beads so that each girl could make a cat collar for their new cat stuffed animals.


Each kid took home a Hershey's bar.

 
I hid these small mouse cat toys around the house and whoever found the most received a small prize.


Just a picture of the decorated craft room where the party was mostly at.


I bought the above streamer that said Happy 1st Birthday so I just printed out a different number and glued it on.


I bought milk cups to serve the drinks in and colorful straws that I attached little flags to.


To see how I made the cake click here.

Cat Shaped Cake


DIY Cat Ears Headband


My daughter had a cat-themed birthday party and I wanted to give each guest cat ears however to buy them on Amazon it was like $4 each.  I wanted something much cheaper so I made the myself.
 
You need:
  • Headbands (I bought mine at the Dollar Tree in a three pack)
  • Felt (in the colors you want the ears to be)
  • Hot glue gun


First I folded a piece of paper in half and drew the shape of the ears that I wanted.  You can do whatever size you want.  I cut out the shape and unfolded it.  Then I traced it onto the color of felt that I wanted the ear to be. 


After the felt is cut wrap it around the headband. and use hot glue to attach the two sides together.  Do this for both ears.


Next I took a piece of paper and figured out how big I wanted the inner part of the ear.  I traced that onto felt and cut it out.


I then glued the inner part of the ear to the ears.


I used various colors of felt for the ears but I used the light pink felt for the inner pat of all the ears.


Thursday

DIY American Girl Dollhouse


Let's start out with supplies needed and round about cost of building. There is another link to decorating the house and the stable that was added to the right side. We will just focus on the actual house. Supplies needed to complete were:

-4 4x8' 3/4" plywood sheets
-2 4x8' 1/4" plywood sheets
-box of trim nails
-box of 1 1/2" screws

Total cost of supplies was about $60.

Tools needed to complete:
-circular saw
-tape measure
-chalk line
-hammer
-drill

I started by cutting two sheets of the 3/4" plywood in half then cutting the top two feet off of each of the four pieces. This gave me the four 2'x2' pieces for room dividers and the four 6'x2' wall pieces. Now cut the other two 3/4" sheets into eight 4'x2' for ceiling and floor pieces. The two 1/4" sheets will be nailed onto the back of the cabinets for strength.

In the picture below I have began assembling the two side walls and top ceiling and bottom floor. I predrilled pilot holes for screws to prevent cracking. I put two screws on each joint with a two nails just for kicks. I assembled the house in two sides. As you can see in the very first picture, there are two cabinets that are identical to make up both sides of the house.

 
Because I was assembling this alone. I used to wood clamp to help me out in making the walls and ceiling pieces square.
 
 
Now that the outer walls, lowest floor and top ceiling are put together. I then added the two remaining floor pieces with walls dividing both rooms. I held everything together with screw and a couple nails on the sides. The added nails of screw gave more strength for doll accessories and whatnots. the second from the bottom floor middle wall had to be attached with a touch of wood glue and two toenailed in screws for strength.

The house rooms are complete now flip over the cabinets and add the 1/4" sheet to back of each cabinet. This will give all needed strength for moving the house around.


Drive trim nails all around the edge of the sheet. I think I put 16 in each cabinet. I also put a screw in each corner for added support.

The construction is complete, onto paint. I used an electric paint sprayer, but anything to put the paint on will work.


We chose just a latex indoor white. The entire project took just a few hours to complete. Moving them up into the bonus daughter's room took just about as much time as it did building. The cabinets are 6x4x2'. Be sure to plan before building and moving.

Once they were in the assigned room. I attached them on the top with just a couple screw and a tie board.


As you can see from this photo I stole from the decorating post on this house. We added peal and stick flooring from any home improvement store. You can buy just a couple pieces for a dollar each tops. Just a tape measure, carton knife, and straight edge for this part. The flooring and decorating did add to the cost by at least double, but we managed to get most everything cheap. Click here to check out the decorating link.