Tuesday

Laundry Room Remodel for $150


I'm so thrilled to have my laundry room done!  When we were looking to buy the house I knew it was going to be a room that needed remodeled but originally I thought I was going to gut it and start from scratch. Unfortunately our budget wouldn't allow that. Originally the budget included gutting the room to get rid of the paneled walls however we decided to really make it a point to pay off $15,000 in student loan debt by the end of the year so that leaves little left in the budget for home improvement. Looks like the kids bathroom will have to wait until next year to be remodeled.

Back to my pretty laundry room. It didn't look very pretty when we bought the house. 


The house came with a stackable washer and dryer but we wanted to put the washer and dryer we already owned in there. It takes up more room but it's newer and I prefer not to have them stacked. There was enough room to put a mini refrigerator next to them so we can keep soda and juice boxes in there and not take up room in the main refrigerator. As you can see the laundry room was chaos. No space for baskets or detergent and it just looked sad with the darker olive green paint. 


First things first. Take down the awkward cabinet by the door. Not only it it painted the same color as the walls it's also upside down. Why was it installed upside down?  I have no clue but it just doesn't fit the space. It's a quality cabinet so my other half was able to put it up in his shop. 


Now that the cabinet it off the wall you can see how dark the paneling originally was. The darker olive green paint doesn't look so bad in comparison to the unpainted paneling. 


Time to pick a paint color. I had already painted the door turquoise a couple weeks after moving in. I wanted the wall to be a similar color but I didn't have any door paint left and my budget was minimal so I found this paint at Walmart for $16 and it matched the curtain I made for the laundry room and was close enough of a match to the door. I wanted the laundry room to be bright and cheery. This color did the trick and let's not mention that the rest of my house it pretty much decorated turquoise in every room. 

First I painted the trim white. Why didn't I take a picture of the trim painted white?  Ugh. I guess I can just blame that on me being so excited to just get painting out of the way because I do not like to paint. 


After a night of the trim paint drying I taped off the trim and started the process of painting the walls. 


I love this little trick I use when painting. I put down Press'n Seal so that any little paint splatters don't get on the ground. I didn't feel like covering the ground with plastic and the ground is concrete anyways so clean up of paint would have been simple. Luckily the Press'n Seal caught all the drips so I didn't have any paint to clean up. 


Now that the walls and trim are paint we can move the washer and dryer over and start building the laundry basket holder. 


My other half built the laundry basket holder in his shop then took it apart so I could paint it. 


Two days of painting the pieces and it was time to assemble the laundry basket holder in the laundry room. 


When I painted the holder in the shop I didn't paint the edges. I painted them once it was rebuilt in the laundry room. 


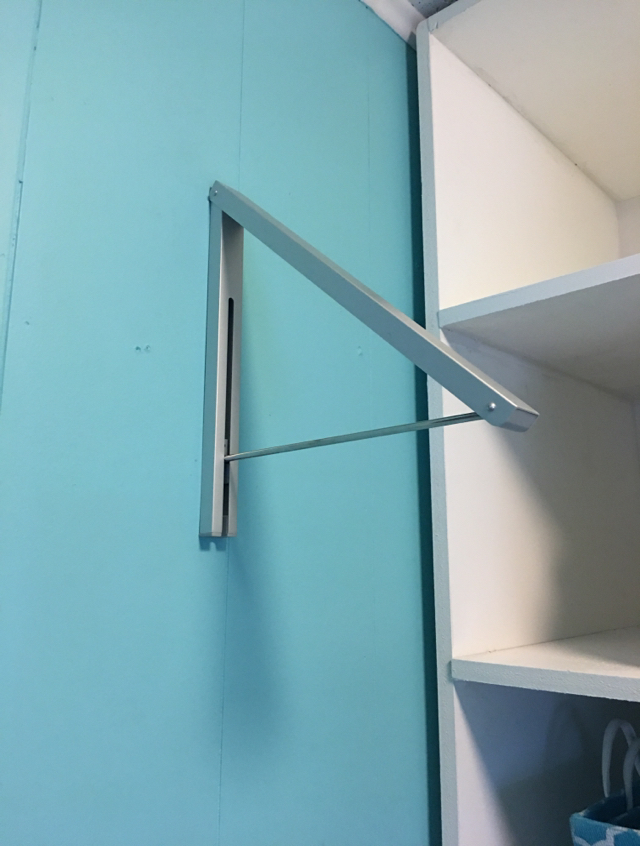
I purchased this collapsible hanger holder. It is small and pops out so that I can hang laundry to dry. 


I hung up the hooks that where already in the laundry room when we bought the house. 


I used an old piece of wood we found in the shed that was left from the previous owner of the house. We used brackets and put it above the washer and dryer. We decorated the shelf with things we already had around the house. 


Let's not forget about the sign I made that says "Laundry Sucks". 
 

The result of this remodel is just awesome!  Here's the breakdown of the cost to remodel.

$35 - the painters tape, paint tray and 2 gallons of paint (blue and white from Walmart)
$3 - pack of hooks
$14 - piece of thin wood for the back of the laundry basket holder
$95 - MDF for the laundry basket holder, trim for the corner of the room where the cabinet was, and brackets for the shelf

Total: $147


Overall, this remodel took us about a week to compete because we took our sweet time to finish it.  e were not in a hurry to get it done so we made sure to really let the paint dry for a couple days on the walls and laundry basket holder.

This remodel will work for the next couple years until we decide to gut the whole area and put up drywall instead of paneling but for only $150 this laundry room "facelift" will work just fine until then.


Monday

Extend Your Curtains


I'm so excited to share this project!  I'm so happy with these curtains. I seriously walk by the dining room anytime I can to look at them. They are perfect for that room. But they were not perfect when I first bought them. 


I found these curtains at TJMaxx on clearance for $20. They match my home decor perfectly so I had to have them. I didn't really read the dimensions when I bought them. I just knew I had to have them. Well when I put them up they looked just so sad. I was not pleased. I considered taking them back but I'm so glad I didn't. 

When we purchased our home the old owners left all the curtain rods and curtains they had in the home. Although I was not fond of the curtains I didn't mind not having to buy curtain rods. 


These are the original curtains when we bought the home. As you can see they don't skim the floor, which is a must for when I decorate. I took the curtains down and added them to my scrap fabric box because I know I'll find a need for the fabric sometime. With my new curtains not skimming the ground I knew I had to do something. Lower the rod?  No because that would make the window look smaller. My only option was to lengthen the curtains. Which made me think that taking the curtains down was a great opportunity for me to take the curtain rod down as well. I decided to spray paint it white and hang it higher. 

Back to the curtains. I cut the curtains in two pieces. I had some white curtain panels in my fabric box that I decided to sew in between the two pieces of the cut curtains. 


Sewing is not a strong skill of mine but these were pretty simple. Cut straight lines then sew straight lines. It didn't take long at all. 


My other half hung the brackets for me and when he did we measured from the ceiling down. Not the best idea in an old house because the ceiling was kind of at an angle. You can't tell looking at it but once the curtain rods were up it was obviously not level. 


This isn't my best photography work but you can kind of tell in the photo that the curtain rods slopes up from left to right. I didn't want to put more holes in the wall. In fact I didn't want to move the brackets even if it didn't leave holes because the kids were getting home from school soon and I wanted this project to be completed. So I cut a couple strips of card stock and folded them like an accordion and just slipped them in between the bracket and the rod. Unless someone goes to the other side of the China cabinet then it is not noticeable. 


I just love how these curtains look and they were inexpensive. Even though I had to extend them it was worth the effort. They look awesome!


DIY Hot Chocolate Ornaments


I was looking for an inexpensive gift for my children to give to their teachers for Christmas.  In total I needed 6 gifts.  I used to make the kids' teachers movie night baskets (click here to see those), but now that my daughter is changing classes throughout the day and has more than one teacher that gets expensive.  These ornaments were the perfect gift. 

I bought the ornaments at Michaels during Black Friday and they were $3 for 6 of them.  The hot chocolate mix packs are from Walmart. Not sure the exact price because I bought way more than needed so my kids could have the leftovers. Side note...it's actually cheaper per ounce to buy the box of individual packs than the container of just hot chocolate. The red sprinkles were $1 per pack at Walmart in the baking aisle. And the marshmallows were a few dollars and they are not next to the other marshmallows in the store...they are near the hot chocokate mix. Go figure. 


It was so easy to assemble these. I took the metal top off the ornament and used a funnel to put in two packs of hot chocolate mix in each. Then I poured the marshmallows into the funnel, but do this slowly otherwise they just clog up the funnel. I topped that with the red sprinkles. Then I put the top back on. 

I bought little boxes at the Dollar Tree, which were 2 for $1. I used some tissue paper to put in the boxes with the ornament. I printed a little tag that said who it was to and from and...DONE. Super cheap and easy. My kind of project. 
 

Wednesday

DIY Police Box Door


My daughter is a big Doctor Who fan. That's right, I have a Whovian in my house.

I wanted to surprise her so I turned her bedroom door into the tardis door. 


It was incredibly easy to do. First we took the door off and took the doorknob off. 


I spray painted the inside of the door blue. My husband bought two shades of blue for the door. I went with the lighter shade on the right. I think it was a good choice. 


I printed out the police box sign and the other two signs on the door. I laminated the two smaller signs. The police box sign I attached with Mod Podge to a piece of plywood my husband cut and I spray painted back. 


I hand painted the windows. I just painted white first then after that dried I painted the black outlines for the window. If I had used painters tape the lines would have been straighter but I didn't feel like putting that much time into it. 


I used 3M command hook stickers to put the police box sign and the two smaller signs on. I reattached the door knob and hung the door back up. 

So easy and my daughter loves it!


Photo US Map


I absolutely love this gift my other half bought me. You can insert your own photos into the states area. It comes with stencils to cut the pictures out too. 

My bucket list includes going to all 50 states so this map is perfect. We each have been to many other states but we decided to only include pictures from states we traveled to together. 

We purchased the map for $50 and we bought the frame from Amazon for $35. Such a great purchase that we will have displayed for many years. 


We are not affiliated with this company at all. I just really really love this map!


Pink Horse Trailer


It's ok to be jealous of my pink horse trailer...I'm kind of jealous of it myself.  It is so pretty!!!  My other half found this trailer for $1000.  It was ugly and needed some work but I saw the potential.  When we bought it we knew we were going to paint it but I had to convince my significant other to paint it pink.


The trailer was rusty and dirty but overall it did not have holes in it or was the floor in need of repair.  It just needed a little love.


First Cody painted it with primer with an air paint sprayer.  The primer was bought at Rural King and was about $30 a gallon.


Above is the color of our golf cart.  I asked, more like begged, Cody to paint the trailer pink.  He agreed and we decided to have it match the golf cart.


We painted the trailer then added some vinyl an pinstripes.  It is so LOVELY!!!